Documentation
Social Media App
Thank you so much for purchasing our item from codecanyon.
- Version: V4.0
- Author: Viaviwebtech
- Created: 26 January 2024
- Update: 24 January 2025
If you have any questions that are beyond the scope of this help file, Please feel free to email via Item Support Page.
Server Requirements
Checking to ensure that your web host have the minimum requirements to run Social Media App.
- PHP >= 8.2
- Ctype PHP Extension
- cURL PHP Extension
- DOM PHP Extension
- Fileinfo PHP Extension
- Filter PHP Extension
- Hash PHP Extension
- Mbstring PHP Extension
- OpenSSL PHP Extension
- PCRE PHP Extension
- PDO PHP Extension
- Session PHP Extension
- Tokenizer PHP Extension
- XML PHP Extension
- Intl PHP Extension
- GD PHP Extension (or Imagick PHP Extension)
- PHP Zip Archive
- Rewrite Module (Apache or Nginx)
open_basedir must be disabled /bootstrap 775
/storage 775 (recursively) Installation with Apache
Creating a new DatabaseFirst thing you want to do before installing Social Media App Admin is to create a new database on your mysql server.
Your hosting provider is likely to offer phpMyAdmin as the mysql manager. If your hosting provider uses a different database manager, the process will be very similar.
Login to your control panel, find and click phpMyAdmin link.
Navigate to the 'Database' tab located in the top menu. Enter a preferred name for your database, and then click on the 'Create' button to initiate the database creation process.
Uploading FilesUnzip the downloaded package and open the Admin Panel/Code folder to find all the files. You will need to upload these files to your hosting web server root using FTP or localhost in order to use it on your website, usually /path/to/www/ or /path/to/html/ or /path/to/httpdocs/ or /path/to/public_html/.
Note Make sure .env and .htaccess extract properly. If you did't know where is env file then please check File Structure
Go to the script's installation URL. For example http://yoursite.com or http://yoursite.com/public/install
And follow the web installation Steps.
Installation with Nginx
Upload all the Admin Panel/Code package files to your server root, usually /path/to/www/ or /path/to/html/ or /path/to/httpdocs/ or /path/to/public_html/ and set your server configuration like this:
root "/path/to/www/public";
            location / {
               try_files $uri $uri/ /index.php?$query_string;
}- Then restart Nginx.
- Create a MySQL database, add user to it with full permissions.
- Go to the script's installation URL. For example http://yoursite.com or http://yoursite.com/public/install
- And follow the web installation Steps.
Installation Steps
Follow the steps below to setup your Social Media App:
Unzip the downloaded package and open the Admin Panel/Code folder to find all the files. You will need to upload these files to your hosting web server using FTP or localhost in order to use it on your website.
Note Make sure .env and .htaccess extract properly. If you did't know where is env file then please check File Structure
-
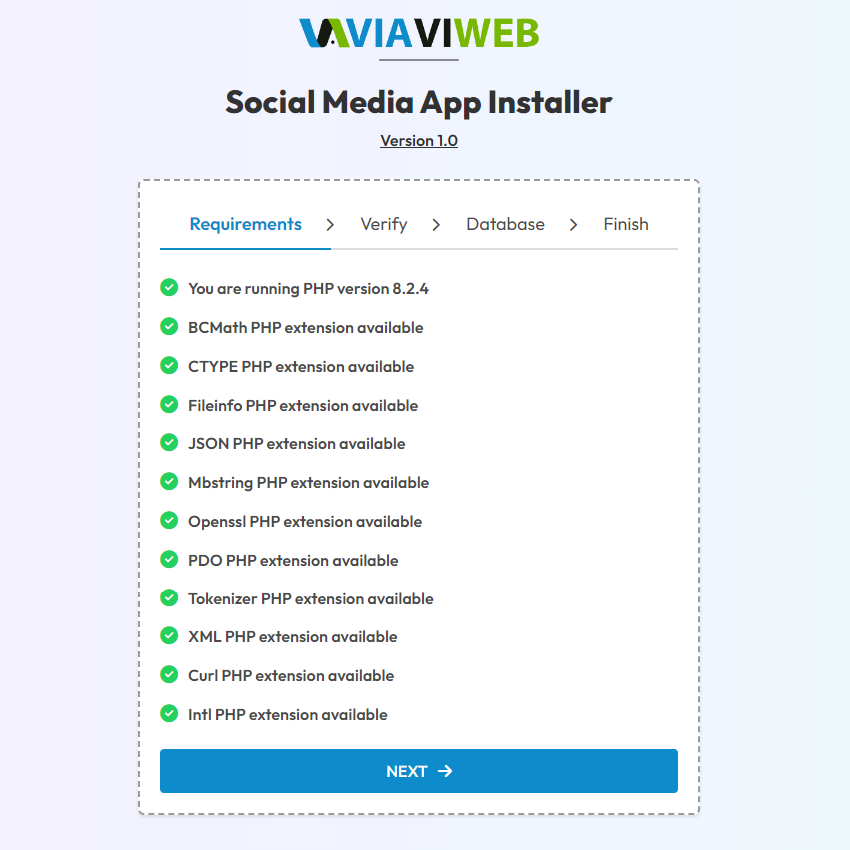
Minimum Requirements
Run your site or sub domain http://yoursite.com
You should now see the minimum system requirements checklist - If there are any issues with the checklist, you will need to fix that before you can proceed to the next step.
-
Verifying Purchase
Where can I find my purchase code? Please read this.
Here you have to enter your Envato username and Item Purchase code.Then click Verify.

-
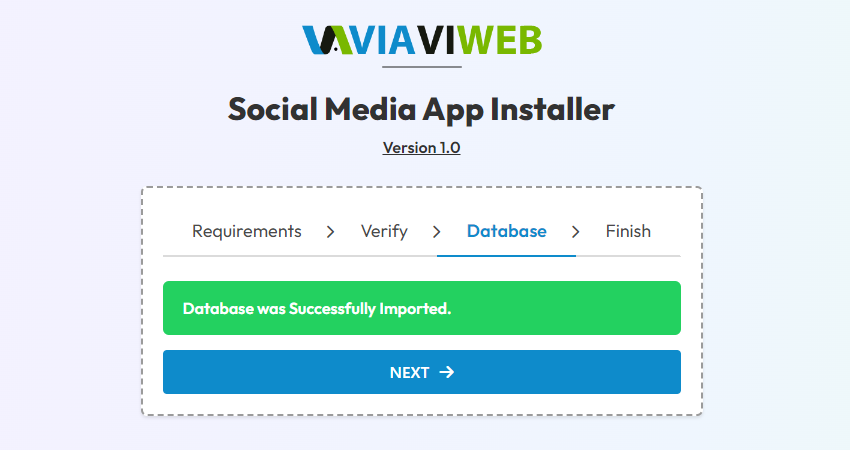
Database Configuration
Enter your
database host,database user,database passwordanddatabase name.
Then click Import, If everything goes well, you should see this page.
Database import step take sometime, So don't do anything when database import.
-
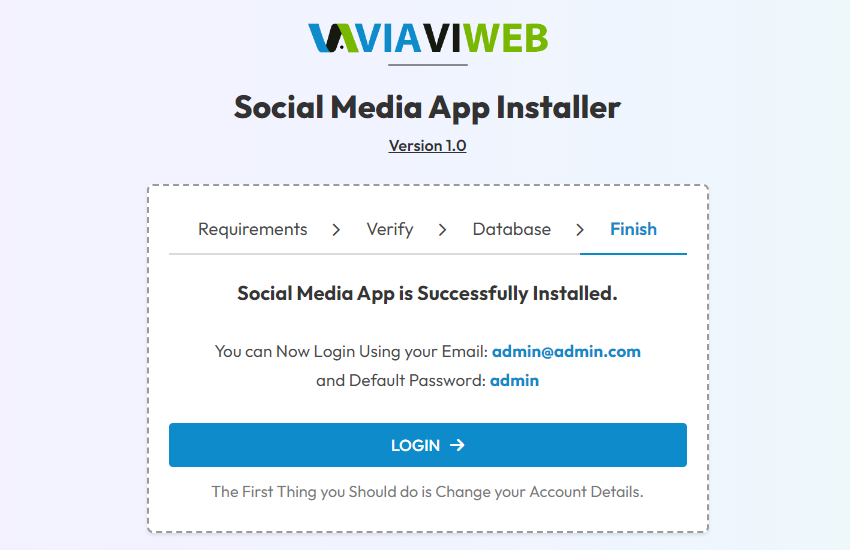
Finish Installation
Congratulations! Social Media App App admin is successfully installed.
Admin Access
Go to http://yoursite.com/admin after successfully configuration
We created default an admin account for you
Email: admin@admin.com
Pass: admin
File Structure
.env and .htaccess configuration files are located here
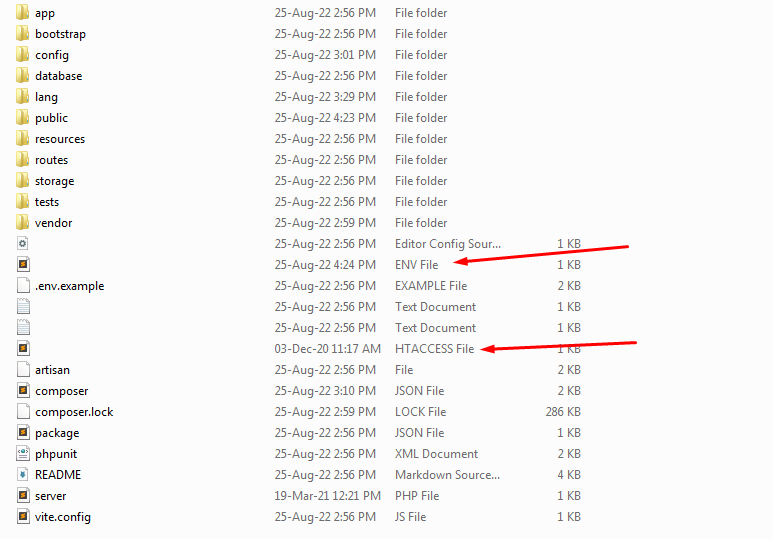
All admin design layout files are located here (resources/views/)

Admin Configuration
To set the app name, logo etc. go to Admin > Settings > General Settings.
General Settings
Following informations needed to be updated.
- app Logo - Pick a png logo.
- app name - Your site name and this is important for search engines
- app email - When you send email that email shown to user.
Email Configuration
So if you want to enable mail sending. Please go to Admin > Settings > SMTP Email

If you have problem with mailing with this setup than please contact your hosting provider with those variables and ask correct info. We recommended use your hosting SMTP email settings.
For Gmail SMTP setup settings
SMTP username: Gmail email address
SMTP password: Gmail password
SMTP server address: smtp.gmail.com
Gmail SMTP port (TLS): 587
SMTP port (SSL): 465
SMTP TLS/SSL required: Select TLS or SSL
Note Now configure your Google account settings visit Google Security Page.
First, Turn on 2-Step Verification.
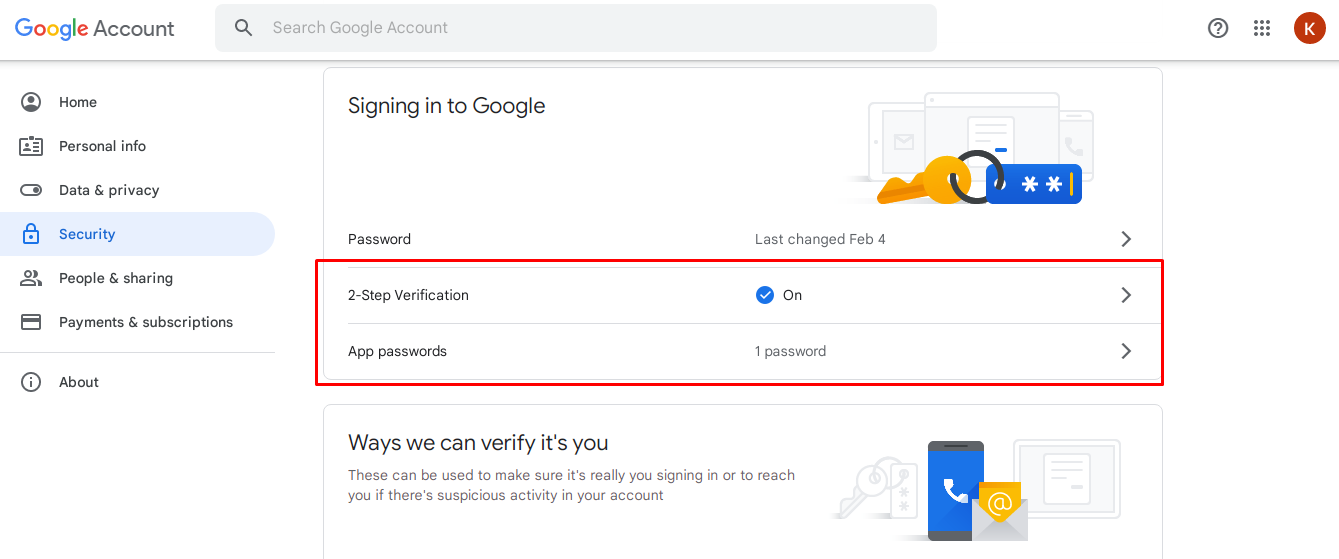
Second, Create App passwords, use this password for email password

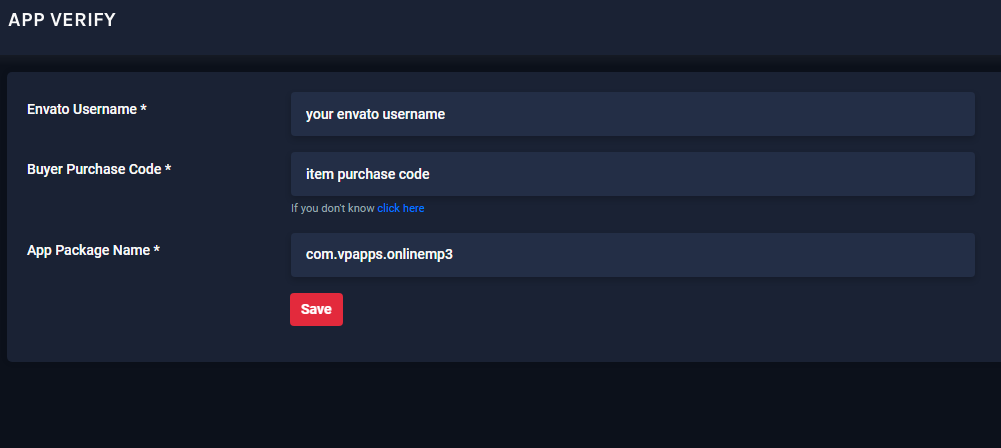
App Verify
Please go to Admin -> App Verify
App Verify contains the envato verified details here. You also can change the package name for android application
FAQ
A FAQ is a list of frequently asked questions (FAQs) and answers on a particular topic.
/resources/views folder.License
Regular LicenseUse, by you or one client, in a single end product which end users are not charged for. You can't Sell the End Product, except to one client. (If you or your client want to Sell the End Product, you will need the Extended License.)
Extended LicenseThe Extended License grants you, the purchaser, an ongoing, non-exclusive, worldwide license to make use of the digital work (Item) you have selected. You are licensed to use the Item to create one single End Product for yourself or for one client (a "single application"), and the End Product may be Sold.
Support
We provide support through Teams, Email or WhatsApp.Teams: Support Viaviweb
Email: info@viaviweb.com OR viaviwebtech@gmail.com
WhatsApp: +919227777522
If this documentation doesn't answer your questions, So, Please send us Email via Item Support Page
We are located in GMT +5:30 time zone and we answer all questions within business hours(10:00 AM to 6:00 PM) in weekdays(Monday to Friday). In some rare cases the waiting time can be to 48 hours. (except holiday seasons which might take longer).
Don’t forget to Rate this script
Go to your Codecanyon Profile > Downloads Tab > & then You can Rate & Review for our script.
Thank You.